$1 Donations make us growth

Showing posts with label HowTo. Show all posts

Wednesday, March 14, 2012

How To: install iPhoto and iMovie on iOS 5.0.1


iPhoto was the big new app release that Apple touted at its new iPad media event, but the bad news is that it requires iOS 5.1.
For those of us with jailbroken iPhone 4S’ and iPad 2′s, this places us in an interesting predicament.
Since there is no way to jailbreak iOS 5.1 on these devices, updating now would not only prevent us from jailbreaking, but it would also prevent us from downgrading back to iOS 5.0.1 now that Apple has closed the signing window for that firmware.
So, what to do? Fortunately, there’s an easy workaround to this problem, and we’re going to walk you through the process on video…


Step 1: Open iFile and navigate to /System/Library/CoreServices

Step 2: Tap on SystemVersion.plist and select Property List Viewer

Step 3: Tap ProductVersion and change 5.0.1 to 5.1

Step 4: Exit iFile and respring your device

Step 5: Open the App Store, and download and install iPhoto, iMovie, etc.

Step 6: Go back into iFile and change back to iOS 5.0.1 and respring prior to opening Cydia.

If you’re using iPhoto, you will need to watch the video below that shows you how to fix the crashes present in iPhoto on iOS 5.0.1. Otherwise the app is completely unusable because it continuously crashes. All you’re doing here is opening Cydia and installing the iPhoto501Fix package. This should eliminate most of the crashes present on startup. 


Let us know if you were able to successfully get iPhoto and iMovie working with your jailbroken iOS 5.0.1 installation.
Hopefully the new iPhoto wasn’t so much of a temptation that you upgraded to 5.1 and lost your jailbreak.
What’s your experience been like?
Update: And if you’re experiencing problems, you CAN switch back to 5.0.1 using the steps above after installing iMovie, iPhoto, etc.


Wednesday, February 22, 2012

How to get a refund from the App Store


The App Store has over 500,000 applications available for download. That means that your iOS device has access to some of the best mobile software money can buy — and, unfortunately, some of the crappiest.
We’ve seen a number of examples of bad software. And no, we’re not talking about the 300+ fart apps out there. We’re talking about apps that you download expecting one thing, and then get another.
Luckily, there is a way to get your money back on these applications…
We touched on this process a few years back, but given all of the recent talk about counterfeit apps surfacing in the App Store, we figured it was time to cover it again.
How to get a refund from Apps Store:-

Step 1: Launch iTunes on your computer, and login to your account.

Step 2: Once in your account, scroll down to your Purchase History and click ‘See All.’

Step 3: You should now be looking at a list of all of your iTunes purchases. Go down to the bottom of the list, and select ‘Report a Problem.’

Step 4: Now select the app that you would like to request a refund on, and again click ‘Report a Problem.’

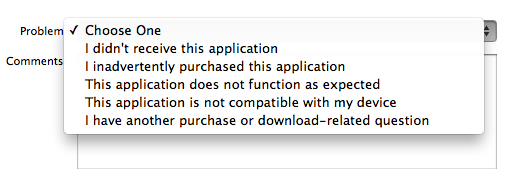
Step 5: Choose a problem from the drop-down menu (hint: there’s 6 options), give a detailed explanation for why you are seeking a refund in the Comment box, and click ‘Submit.’

That’s all there is to it! Don’t expect a refund or response right away. Apple has been known to take weeks to refund customers for app costs — if at all. Keep in mind that the standard policy for iTunes purchases is ‘All Sales Final.’
It’s also worth noting that if Apple does refund your money, they expect the developer to refund them. And they still keep their 30% take. So make sure the app is really worth a refund, because the developer loses $0.30 on the dollar.
Of course, we could avoid all of this nonsense if Apple would just incorporate a trial period for app purchases. Even something short — say 15 minutes — would be enough time to determine if the app worked as advertised.


Friday, February 17, 2012

How to get Siri working on iPhone4 no proxy required


Boys & Girls, this is by far the easiest way to get Siri running on your older devices like the iPhone 4, or iPod touch G4, and it requires no proxy server or meticulous setup.
As long as you have a generous friend that’s willing to send you a file from their jailbroken iPhone 4S, you can have Siri running on an older device in just a few minutes.
Inside, iDB@Jeff will show you through how to use AssistantConnect and AssistantConnect4S on video. It’s extremely simple, just follow this brief tutorial…


Step 1: Install Spire on your iPhone 4, or other older device. Once installed go to Settings > General > and enable Siri.

Step 2: Install AssistantConnect4S on an iPhone 4S device, open the AssistantConnect4S app, and reboot your iPhone 4S.

Step 3: Install AssistantConnect on the iPhone 4, or other older device.

Step 4: After your iPhone 4S reboots open AssistantConnect4S, and then invoke Siri, and ask it anything. Once Siri responds, tap the “Email Siri Data” button, and email the data to the iPhone 4, or other non 4S device. Make sure the attachment has a file size (mine reports 0.9kb) to ensure that it’s not empty.

Step 5: On your iPhone 4 or older device, open the email sent from the iPhone 4S with the attachment, and open the attachment. Tap the button that says Open in “AssistantConnect”. AssistantConnect will open to a dialogue that says “File Copied” and “AssistantConnect File Loaded Successfully”. Tap Dismiss, go to your Home screen, and respring or reboot your device.

Step 6: Once your iPhone 4 or older device is back up, hold your Home button to invoke Siri and ask her a question. It should work just like on an iPhone 4S!


And that’s it. This is by far without a doubt the easiest way to get Siri outside of buying your very own iPhone 4S.
Have you tried it? Were you successful? Let us know what your experience has been with AssistantConnection. 


[Via: idownloadblog]

Search This Blog

Popular Posts